Learning the basics of AWS
Amazon Web Services (AWS) is a comprehensive cloud computing platform that includes infrastructure as a service (IaaS) and platform as a service (PaaS) offerings. AWS services offer scalable solutions for compute, storage, databases, analytics, and more. *From the AWS website
- Create a new AWS account
- Secure the root user
- Create an IAM user to use in the account
- Set up the AWS CLI
- Set up a Cloud9 environment
When setting up a new AWS account, you need to secure the root user and create additional AWS IAM user to log into the account. The root user is a special account that has full access to the account and can perform all actions including changing payment methods or closing the account. Due to this, it is recommended to secure it with 2-factor authentication and set up additional IAM users to log in with.
Multi-Factor Authentication
To set up MFA on your AWS account, go to the search bar and type ‘IAM’ and click on the result. This will take you to the IAM Management Console where you will see the security recommendations at the top of the dashboard. Click on ‘Add MFA’ and then ‘Create MFA’ in the next screen.
You will now need to choose between the available MFA options. If unsure which option to pick, choose ‘Virtual MFA device’ and install one of the apps available for your mobile phone. For Apple, I chose the app ‘Symantec VIP Access’ and scanned the provided QR code followed by the two authentication codes shown on the app. The root user login is now secure.
Setting up additional users and roles
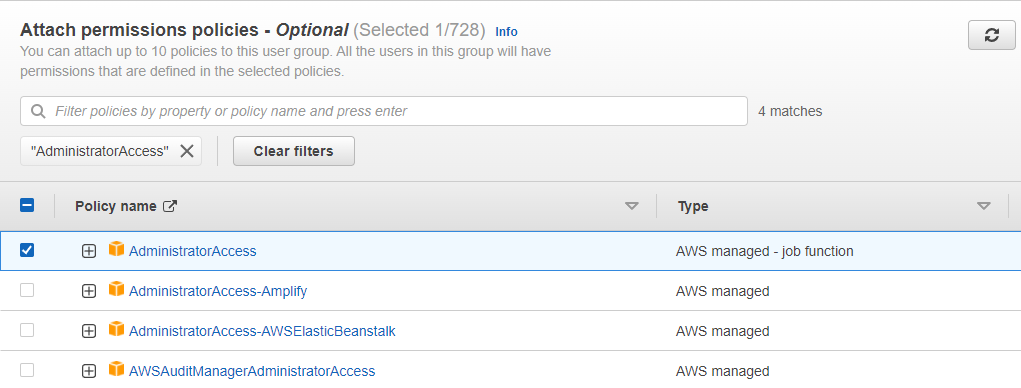
It is considered a good security practice to not use your root account for day-to-day use, but instead create separate users for specific roles and functions. To set one up, you will first create an IAM User group – this will have a set of permissions that applies to any user in that group.
In my example, I made a user group called ‘Administrators’ and gave it the ‘AdministratorAccess’ permission policy using the search bar as shown below:
After creating the user group, you can now create individual users that will all have the ‘AdministratorAccess’ permission.
I created a simple user called ‘brandon’ for my example and for the AWS access type, I selected both the programmatic access key option and the password option for more security. In order to log into the IAM account, you must provide the given access key ID and the password, which can either be autogenerated or a custom password. In my case, I chose the autogenerated option.
After setting the user details, you can move on to the permissions tab to assign the user to a user group, in this case, ‘Administrators.” You can assign IAM tags to better organize, track, or control access for a user. In this example, I assigned no tags. You can then review all the applied settings for the user and click ‘create user.’
Setting up the AWS CLI
The AWS Command Line Interface (CLI) is a unified tool to manage your AWS services. With just one tool to download and configure, you can control multiple AWS services from the command line and automate them through scripts. To interact with AWS using the CLI, we need to configure credentials for it to use when making API calls. *From the AWS website
To install the AWS CLI, you can either download and run the AWS CLI MSI installer for Windows from the website, https://awscli.amazonaws.com/AWSCLIV2.msi , or by running the command prompt as an administrator and typing in the following command:
C:\> msiexec.exe /i https://awscli.amazonaws.com/AWSCLIV2.msiAfter installing, type the command ‘aws –version’ to confirm the installation.

We can now configure the user group by typing the command ‘aws configure.’ It will ask for the AWS Access Key ID and the Secret Access Key that was assigned to the user group. It will then ask for the region you would like to set as the default and also the default output format (JSON or YAML).
You can then use the command ‘aws ec2 describe-vpcs’ to confirm these assignments.
Setting up the Cloud9 IDE Environment
AWS Cloud9 is a free cloud-based integrated development environment (IDE) that lets you write, run, and debug your code with just a browser. It includes a code editor, debugger, and terminal. Cloud9 comes prepackaged with essential tools for popular programming languages, including JavaScript, Python, PHP, and more, so you don’t need to install files or configure your development machine to start new projects. Since Cloud9 IDE is cloud-based, you can work on your projects from your office, home, or anywhere using an internet-connected machine. *From the AWS website
In order to log on to the IDE, you need the Environment ID for the user you are using.
aws cloud9 create-environment-ec2 --name getting-started --description "Getting started with AWS Cloud9." --instance-type t3.micro --automatic-stop-time-minutes 60The above command will output the Environment ID.
You can then type the URL ‘https://console.aws.amazon.com/cloud9/ide/<environment ID>?region=us-west-2’ using the provided environment ID and the selected region.
The AWS Cloud9 IDE is now set up.
Summary
- Amazon Web Services (AWS) is a comprehensive cloud computing platform that includes infrastructure as a service (IaaS) and platform as a service (PaaS) offerings. AWS services offer scalable solutions for compute, storage, databases, analytics, and more.
- It is considered a good security practice to not use your root account for day-to-day use, but instead create separate users for specific roles and functions.
- The AWS Command Line Interface (CLI) is a unified tool to manage your AWS services. With just one tool to download and configure, you can control multiple AWS services from the command line and automate them through scripts.
- AWS Cloud9 is a free cloud-based integrated development environment (IDE). It includes a code editor, debugger, and terminal and comes prepackaged with essential tools for popular programming languages, including JavaScript, Python, PHP, and more, so you don’t need to install files or configure your development machine to start new projects. Since Cloud9 IDE is cloud-based, you can work on your projects from your office, home, or anywhere using an internet-connected machine.
-Practices and information provided by the AWS website https://aws.amazon.com/getting-started/