What is a recursive DNS server?
When you type a domain name into your browser and search it, you trigger a DNS lookup. A DNS lookup is where a DNS server communicates with several other DNS servers to track down an IP address and return it to the client. During the DNS lookup, a series of DNS servers then finds the IP address for that domain and returns it to your computer so that you can access the correct website.
From the point of an attacker, the DNS servers of larger providers are very worthwhile targets, as they only need to poison one DNS server to affect millions of users.
Setting up Pi-hole
Pi-hole is a Linux network-level advertisement and Internet tracker blocking application which acts as a DNS sinkhole and optionally a DHCP server, intended for use on a private network. Wikipedia
Pi-hole is very easy to install on your Raspberry Pi as the website contains all the repositories needed for the installation so a little curl magic is all that is need to get started:
curl -sSL https://install.pi-hole.net | bashYou can either do this on the terminal within your Pi by connecting it to a monitor, or by connecting to it via SSH on your main computer.
This will take you to a set-up wizard where you select the network and static IP address. After the setup, you will be provided with your DNS server IP address.
To access the admin page, go to your browser and type in DNSip/admin (DNSip is the provided IP address). At the dashboard, you will notice information regarding query activity on the DNS server and its blocked domains. The side navigation menu provides further detail and customization to your server.
Setting up Unbound
To set up Pi-hole as a fully-functional recursive DNS server solution, I will be using Unbound, a secure open-source recursive DNS server primarily developed by NLnet Labs, VeriSign Inc., Nominet, and Kirei. The first thing you need to do is to install the recursive DNS resolver:
sudo apt install unboundAfter installing the server, head to this website and scroll down to “Configure unbound.” in the Pi terminal, type command:
sudo nano /etc/unbound/unbound.conf.d/pi-hole.confThis will open up the config file in the text-editor, Nano. On the website, copy the list of configurations and paste them into the file and save and exit.
Start your local recursive server and test that it’s operational:
sudo service unbound restartdig pi-hole.net @127.0.0.1 -p 5335To test DNSSEC validation, type:
dig sigfail.verteiltesysteme.net @127.0.0.1 -p 5335dig sigok.verteiltesysteme.net @127.0.0.1 -p 5335The first command should give a status report of ‘SERVFAIL‘ and no IP address. The second should give ‘NOERROR‘ plus an IP address.
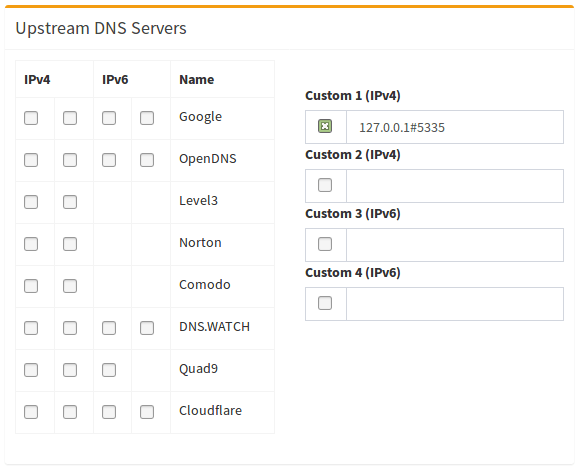
The last thing you need to do is configure the Pi-hole to use your recursive DNS server in the admin page. Head to settings -> DNS and then uncheck your selected upstream DNS servers (IPv4 on Cloudflare for me). Check Custom 1 (IPv4) and type in 127.0.0.1#5335.
To disable resolvconf for Unbound, first check if the service is active.
sudo systemctl status unbound-resolvconf.service
To disable the service:
sudo systemctl disable unbound-resolvconf.service
sudo systemctl stop unbound-resolvconf.service
To have the domain_name_servers= in the file activate/propagate:
sudo systemctl restart dhcpcd
Verify your DNS server is working by connecting a device on the same network by configuring the IPv4 adapter settings in the device’s network settings to use a manually entered DNS server (the IP for your server). Go to an ad-ridden website (such as msn.com) and see the magic take place.
I followed a couple different YouTube tutorials in order to get my Pi-hole up and running. If following along with a video is more your style, you may follow these links: